Release Date: Production 1 February 2018
Status: Released to Production
For detailed information on Aztec 3.10.0 please view a section below.
For more information any of the features introduced in this release click the title link to navigate to the new feature information.
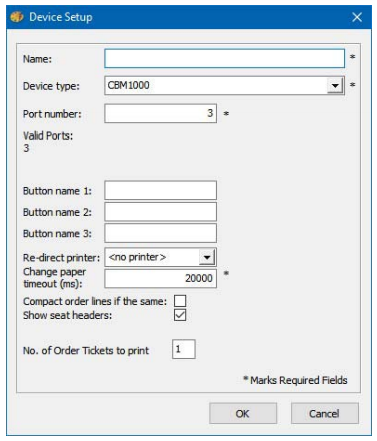
Control Dispense Ticket Print Quantity - Zonal ID PM963
This enhancement only applies to order tickets and Zonal supported kitchen printers
Head Office Configuration - Enable Feature
-
Open Aztec Theme Modelling | Site Setup | Devices tab
-
Double click the required printer to open the device setup window
-
Within the No. of Order Tickets to print field, enter the required number, up to a maximum of 5
-
Click OK, Close the device setup window and Exit Theme Modelling
Head Office Configuration - Send Changes to Site(s)
For the new settings made at Head Office to take effect at site, perform a communications job to the required site(s).
For detailed information on running communications jobs please click here.
Change Order Destination when Order in Progress - Zonal ID PM995
Unsaved items that have been rung up with an order destination can now have the order destination changed if necessary. For example, a customer may request
‘Sit In’ but then due to circumstances, asks to change this to ‘Take Out’. Assuming the items in the order have only been rung up but not saved or paid
off, then the destination can now be changed as necessary.
To benefit from this enhancement, mapping of portions must be configured to control which alternative portion is used when an order destination is changed.
The new enhancement, when configured correctly, will take into account any price changes associated with the change of order destination. All rules linked to the new order destination are recalculated and applied, as are any tax rate changes, print settings and promotional eligibility.
This feature is only supported when conversational ordering is enabled
Head Office Configuration - Portion Mapping
Equivalent portion mappings are needed to control which alternative portion should be used when an order destination is changed. For example, if I have Coffee in these portions:
-
Sit-in - Small; Medium; Large
-
Take-away - TAway Sml; TAway Med; TAway Lrg; TAway XXL Bucket
mapping could be configured so that:
-
Small = TAway Sml
-
Medium = TAway Med
-
Large = TAway Lrg
-
TAway Sml = Small
-
TAway Med = Medium
-
TAway Lrg = Large
-
TAway XXL Bucket = Large
Mappings must be configured for each direction. For example, if you create a mapping from a ‘Takeaway’ portion type to a ‘Sit-in’ portion type, the system does NOT automatically create the reverse mapping from Sit-in to Takeaway. This must be done manually (if required)
To configure order destination portion mappings, to enable order destination changes on the POS:
-
Open Aztec Base Data | Order Destinations | Select a Destination
-
Open the Portion Mapping tab
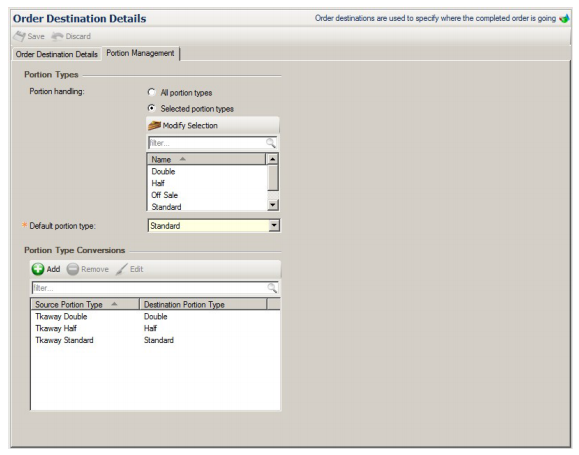
Portion mapping shows the order destinations that are configured to use a subset of portions when the 'Selected portions types' radio button is selected. If the ‘All portion types’ radio button is selected, the conversion mapping section is disabled and the contents cleared.
-
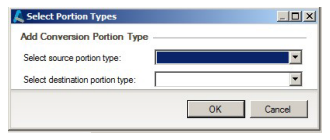
To add a portion mapping, ensure the ‘Selected portion types’ radio button is selected, and click Add. The Select Portion Types screen is displayed
-
Use the two drop-down lists to select the source and the destination portion type, click OK after each mapping
Head Office Configuration - Add button to Theme
The Change Order Destination button needs to be added to the relevant theme, this can be found in the button picker under Other Lists | Change Order Destination
For detailed information on adding buttons to theme panels root or local panels click here or for shared / variation panels here.
When an order destination button is added to the theme, the button text changes to 'Change to <Order Destination>', for example when the 'Takeaway' button is selected in the button picker and added to the theme, the button text becomes 'Change to Takeaway'
Head Office Configuration - Send Changes to Sites
For the new settings made at Head Office to take effect at site, perform a communications job to the required sites.
For detailed information on running communications jobs click here.
POS Terminal Operation
Only unsaved items that have been already rung up on a different order destination can be changed. Any items which have been saved (and have been already sent to kitchen) would need to be void and rung up again for the new order destination (as per previous functionality).
It is now possible to start with a specific order destination, ring up some items, then change (for example to Takeaway), then continue to ring up more items.
When there are items on the order screen for multiple order destinations, any change of order destination changes all items which are not already for that order destination to the new selection.
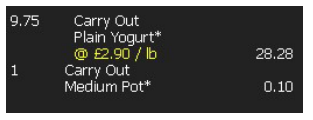
Weighed products with a Tare
The quantity of the product does not change when the destination is changed, but the price may change.
As Eat in:

Becomes as Carry out:

Weighed products with separate tare child products
The quantity of the product does not change when the destination is changed, but the price per weight may change and the price of the container may change.
As Eat in:

Becomes as Carry out:
If there is at least one item which cannot be sold in the new order destination, then switching order destination is disallowed. Other reasons for disallowing order destination changes include:
-
price / product not available for the mapped portion
-
incompatible choice selection / if any of the choices under that product are not available in the alternative order destination
-
product is a redemption from an externally triggered product or gift card
Failure of order destination change followed by an error message include:
-
product is an external (non-Aztec) product
-
gift card
-
product has discount applied
-
Example message:- 'Could not change destination as Rolling Rock has a discount applied'
-
-
product does not have converted portion
-
Example message:- 'Could not change destination as Guinness cannot be sold as Carry Out portion'
-
-
product has no price for converted portion
-
Example message:- 'Could not change destination as Bacon does not have a price defined for portion Carry Out'
-
-
product choices (tabs) for alternative portion are incomplete
-
Example message:- Could not change destination as the Egg Breakfast recipe is incomplete for portion Carry Out'
-
-
product choices (tabs) for alternative portion up to last selected choice do not match
-
Example message:- 'Could not change destination as Choices are incompatible for recipe Egg Breakfast for portion Carry Out'
-
-
product defaults (tabs) for alternative portion do not match if defaults have been removed
-
anded order line has different destination than parent.
-
Example message:- 'Could not change destination as Anded line Rolling Rock has destination Eat In but parent has destination Student'
-
Reasons order destination buttons may be greyed out / unselectable (No Go):
-
account is in Sequential ordering mode
-
all unsaved lines are for this destination already
-
order destination is not available on this site
-
account discount applied
-
current account is DriveThru
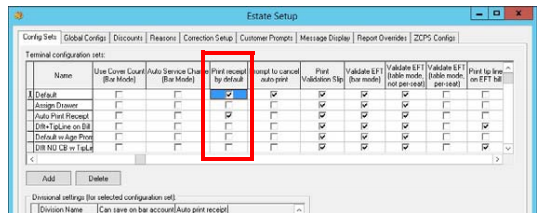
Prompt Before Printing Receipt - Zonal ID PM997
Head Office Configuration - Enable Feature
-
Open Aztec Theme Modelling | Estate Setup | Configs tab
-
Scroll through the required terminal configuration set and check Prompt to cancel auto-print
-
Select Closeand Exit Theme Modelling
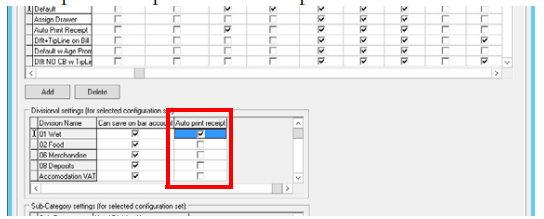
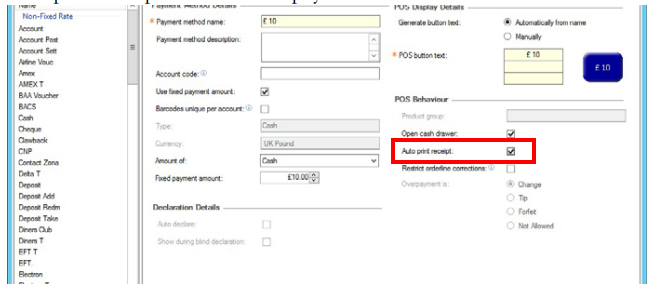
The new prompt will only be displayed if it is enabled in conjunction with any of the following scenarios:
-
The config set in use by the POS is set to 'Print receipt by default':
-
'Auto print receipt' is set for the product division:
-
'Auto print receipt' is set for the payment method in Aztec Finance:
Promotional footers - when promotional footers are in use for the site, with or without ‘Full cut after receipt’ set, the prompt is not displayed and receipts are printed automatically.
Optional target printer - If optional printing has been enabled for this site, allowing the user to select the target printer, then the new print confirmation prompt (if enabled) is displayed before the printer selection window. In this case, if Aztec is configured to prompt for receipt printing and ‘No’ is selected, the second printer selection prompt is therefore not needed / displayed.
Head Office Configuration - Send Changes to Sites
For the new settings made at Head Office to take effect at site, perform a communications job to the required sites.
For detailed information on running communications jobs click here.
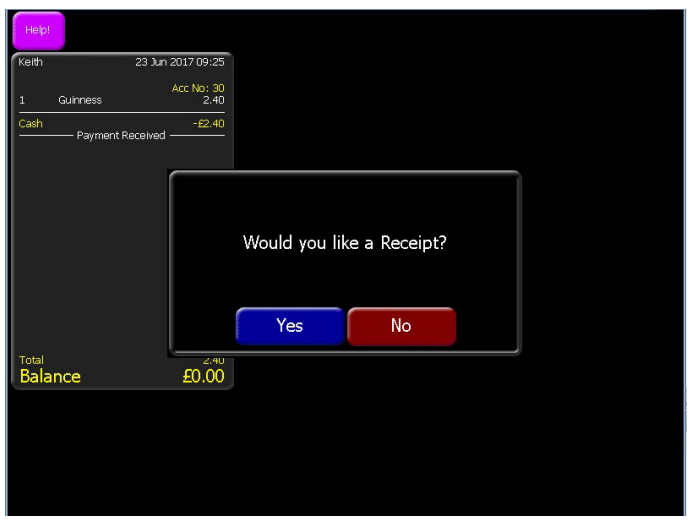
POS Terminal Operation
When an account is created on the POS terminal, the following new prompt is displayed when the account is paid off:
Enhanced Comms Summary Report - Zonal ID PM1003
Head Office Configuration - Create Tags
To specify that individual sites be included in the report, site level locale tags can be set. This allows the report to cover specific sites spread over multiple areas. It also covers the example where an Area has three sites in England and three sites in Wales, if the Area is tagged as Wales then the user only need to tag the three English sites, the customer could then set up two auto email reports, one for England and one for Wales.
To configure Aztec to allow location selection in the Comms Grouped Summary report, a range of location tags must first be set up:
-
Open Aztec Base Data | Tag Configuration
-
Click Add and create a new tag called ‘Locale’ and ensure the Location Tag check-box is selected
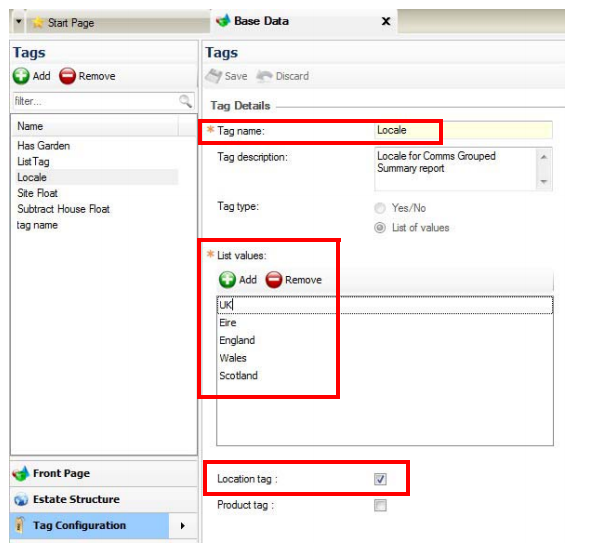
-
Within the list values section, click Add and create a tag for each location or area that is appropriate for your estate. The example above shows country tags but this could also be areas if appropriate
-
Click Save
Head Office Configuration - Assign Tags to Sites
-
Open Aztec Base Data | Estate Structure | Select a Area or Site
-
Select the tag created, and repeat for each area or site as required
-
Click Save
Head Office Configuration - Send Changes to Sites
For the new settings made at Head Office to take effect at site, perform a communications job to the required sites.
For detailed information on running communications jobs click here.
When sites have been configured with the relevant locale tags, contact your Zonal Account Representative to update the automatically generated emails to also be locale specific
Price Embedded Barcodes now handle Reverse Payments - Zonal ID PM1004
include a barcode to be scanned on another (third-party) POS terminal, where the balance on the account could be taken.
This allows Aztec to be used primarily as a central order only terminal, printing to a receipt printer and kitchen printer. The printed receipt, bearing the associated barcode, can be scanned on a third-party retail terminal for processing payments.
This enhancement maintains that previous functionality and now adds handling for reverse payments. This now means that any transactions that result in a payment line that is credited in the customer’s favour also produce a receipt containing a barcode.
Head Office Configuration - Enable Feature
-
Open Aztec Theme Modelling | Estate Setup | Configs tab
-
Scroll through the required terminal configuration set and check Print Price Embeded Barcode
-
Select Closeand Exit Theme Modelling
Head Office Configuration - Send Changes to Sites
For the new settings made at Head Office to take effect at site, perform a communications job to the required sites.
For detailed information on running communications jobs click here.
POS Terminal Operation
When operating in this mode, the Aztec POS follows normal POS behaviour. Reversals, voids and other actions on the closed account are all carried out as normal and an updated receipt produced on account (re)close.
Reprints do not generate a barcode, receipts of this type being marked as duplicate. Only when the account changes value is a new barcode generated and printed.
Enhanced Money Belt Declaration Report - Zonal ID PM1007
The Money Belt Declaration report has been enhanced to allocate space for the name of the Service Manager and also for the Cash Office stamp.
Sub-Category Settings Text Enhanced - Zonal ID 172304
To ease Aztec configuration and maintenance, for customers and support staff, this enhancement to appends the text "(for selected configuration set)" after 'Divisional settings' and 'Sub-Category settings' text in Aztec Theme Modelling Estate Setup.
This makes it more obvious that it only applies to the current config set to prevent users getting caught out by the fact that sub-category/divisional settings are specific to the terminal configuration set that is currently selected and also prevents the occasionally reported configuration problem of posting everything to the same division.
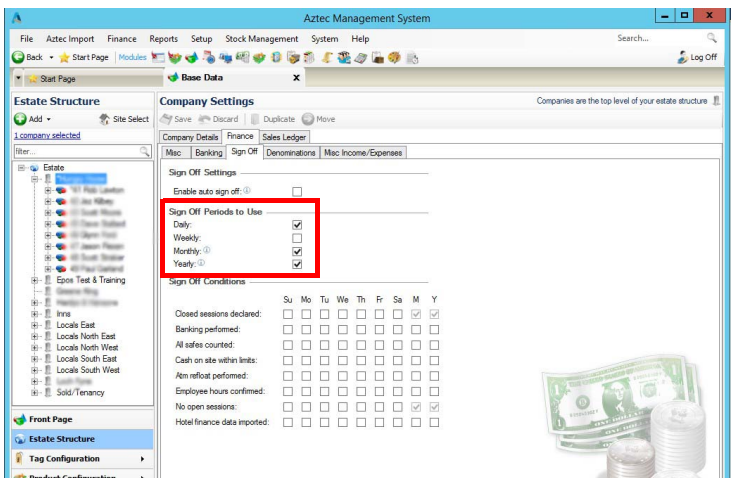
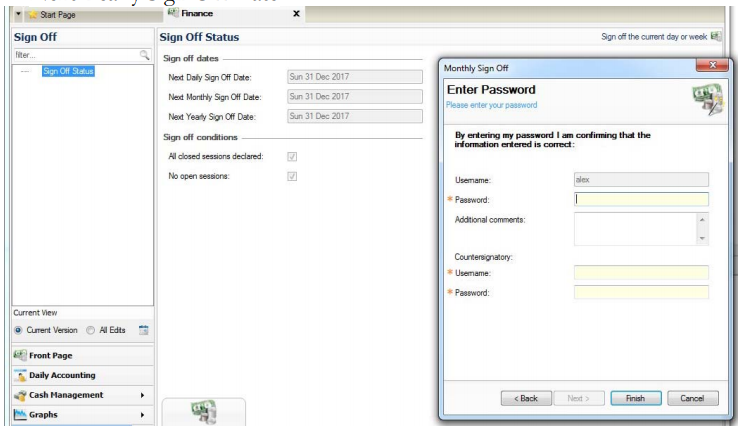
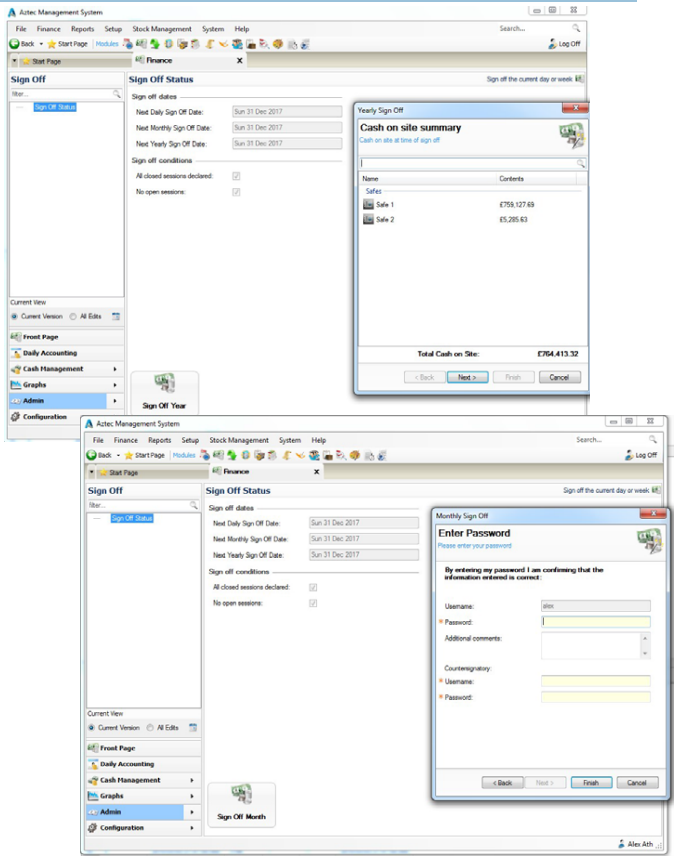
New End of Year and End of Month Sign Off - Zonal ID 202131
In addition to the existing End of Day and End of Week signoff function in Aztec Finance, an End of Month and End of Year capability is added.
Head Office Configuration - Sign Off Configuration
On upgrade to Aztec 3.10.2, the system defaults to calendar year. If fiscal year is required, contact your Zonal Account Representative as only Zonal Administrator level users can make the necessary database change to define this setting. However, if only monthly sign off is required, no further configuration is required
-
Open Aztec Base Data | Estate Settings | Company Settings | Finance tab | Sign Off tab
The Sign Off Periods to Use group box contains two additional check-boxes for Monthly and Yearly sign off. The Daily Sign off check-box must be selected to
activate these additional check-boxes:
Enable auto sign off rules are unchanged by this feature, as auto sign off is only performed for the daily part of the selected sign off policy
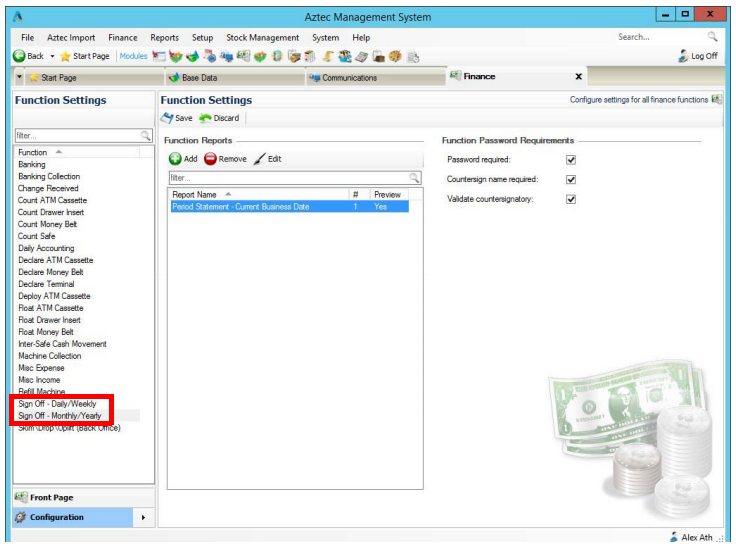
Head Office Configuration - Report Configuration & Sign Off Passwords
-
Open Aztec Finance | Configuration | Function Settings
-
Select Sign Off Monthly / Yearly from the function settings list and configure auto print reports or password requirements as needed for the organisation
Head Office - Information
The Things To Do list at head office will list all sites that require the new monthly and yearly sign off (as separate entries).
Clicking these entries will list the sites that require sign off as per the current functionality for daily and weekly sign off.
Site Operation - Sign Off Status
Depending on the sign off policy selected (at head office) the screen below will show the next sign off date for each period. When monthly and yearly sign offs are included in the policy, this screen would show two additional fields:
-
Next Monthly Sign Off Date
-
Next Yearly Sign Off Date
There is only ever one sign off button at the bottom of the screen, when a sign
off period has been completed; the button then displays the next available sign
off period:
-
Sign Off Day – as per current functionality
-
Sign Off Week – as per current functionality
-
Sign Off Month – This will only be enabled / visible when the actual end of month has been reached and all daily sign offs for the calendar month have been completed
-
Sign Off Year - This will only be enabled / visible when the actual end of year has been reached and all daily sign offs for the year have been completed
Site Operation - Monthly and Yearly Sign Off Wizards
Both of these new wizards consist of two steps:
-
Cash on Site Summary step
-
Password / Comments step
The monthly and yearly sign off process will audit the user performing the sign off, if they entered a password and the counter signatory details if present:
Should a site fail to sign off a month or year then any finance module functions will continue to function, however the date of an action (count, bankings, misc income / expense etc) will be recorded against the latest active day (signed off date + 1 day) as per current functionality
Site Operation - Things To Do List
The TTD list at Site on the Finance Front Page will list all the tasks that are outstanding for the current site, including monthly and yearly sign offs (as separate entries). Clicking these entries will take the user to the sign off screen.
Additional Storage Locations for Raw Audit Trail Data - Zonal ID 215379
Aztec can now be configured (by a Zonal Administrator only) to configure whether a site will send POS audit information off site for storage. When configured on, all POS audit information for each physical POS and MOA terminal is copied to an external repository.
Audit information sent to an off-site/central repository will be identifiable by Estate, by Site and by POS.
The endpoint / location that the information is sent to can be configured and this endpoint / location is first authenticated.
Existing Aztec auditing to the site PC operates as previously, irrespective of whether audit data is configured to be copied to an off-site location, or not.
Add New Items to Stock Locations on Mobile Stocks - Zonal ID 198801
A new configuration defines whether the user is prompted to add these items to a stock count location.
The new configuration is defined at Head Office and applies to all stock threads; this is only allowed if location counting is enabled
Head Office Configuration - Enable Feature
A new configuration called 'Confirm mobile stock count imports for locations' is added to the Threads Configuration screen under the "Use Holding Zones or
Count Locations" section. The new setting is disabled by default. When enabled, if a mobile import location list does not match the configured location list, the site user will be told the reason for the mismatch and prompted to confirm / cancel the import. Also (when enabled), if the mobile stock count contains new items at the end of the configured location list (i.e. the location row number is greater than the highest row number in the configured list) then the user will be asked if they want to add the new items to the configured list.

Head Office Configuration - Send Changes to Sites
For the new settings made at Head Office to take effect at site, perform a communications job to the required sites.
For detailed information on running communications jobs click here.
Site Operation
Product count import rules
-
Configured List - The products and location list set up at site (Aztec Stocks | Configuration | Count Locations / Holding Zones)
-
Import list - The product location list imported from the mobile stock count
-
List Matching - For an import list to be fully imported it must match the configured list. This means the product and the row order must be the same as defined in the configured list. Any variation of this will result in a partial or zero import of stock counts. A mismatch can be the result of either the import containing a product out of order, or the configured list having been edited in such a way that the matching rule is not met (new product added / removed, or a product’s position moved)
Import Rules
Previously, if the configured list and import list matched, then all product stock counts were imported.
If the configured list and import list had a mixture of matched and mismatched product counts, then only the matched product stock counts would be imported up to the first mismatched count.
If the import list contained additional new items, these were not added to the configured list.
Multiple Count Import
If importing multiple counts for the same location:
-
Overwrite Existing Counts - The import started with the earliest (mobile stock count end date) location count and repeatedly overwrote the stock audit figures until the most recent location count had been imported, i.e. the most recent location count was used
-
Add to Existing Counts - Each location count in order (of earliest first) is added cumulatively to the stock audit count
-
Fill unaudited Products Only - Only stock audit counts with a null or zero value will be populated and the same logic for Overwrite existing counts is used
Confirmation Dialogs
The following dialogs are shown when the ‘Confirm mobile stock count imports for locations’ check-box is enabled at Head office.
If the configured list has changed since the mobile stock session was started and there are mismatched products / units then the user will be shown the following warning:

Select Yes to proceed with the import and only matched products will be imported.
Select No to cancel the import and either return the user to the main import screen (if only one import was selected), or if multiple imports were selected then it will process the next location import.
In the case where new product counts have been added to the end of the import list that are not in the configured list AND these items have row numbers greater that the max row number in the configured location list, then the user will be shown the following warning:
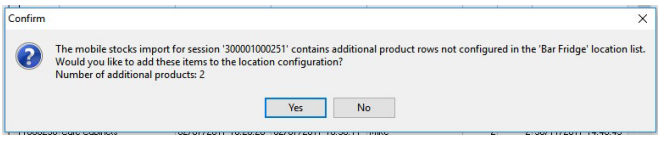
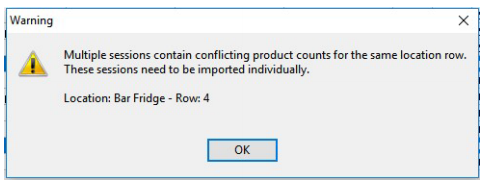
Multiple Counts for Single Location
If the user has selected to import multiple mobile stock counts from the same location and two (or more) of the same location contains additional items with the same row number but differing product and / or unit, then the user will be informed that these counts cannot be imported and will have to be manually
imported individually.
In the case where one or more session location counts contain conflicting rows, then user will be asked if they want to import any remaining valid location counts or to abort the import process:
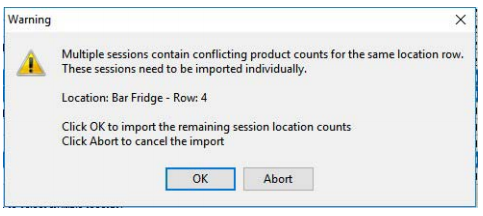
If there are no valid location counts remaining then the user will be informed and the import will be aborted:
The above dialogs are shown for each of the selected session location imports. For example, if three locations are selected the user could potentially be presented with six confirmation dialogs plus an additional dialog if there are any conflicting rows between locations
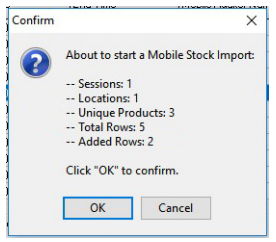
The final dialog shown to the user is the previous import confirmation dialog but now it shows the total number of rows that will be added to the configured location list. At this point the user has the option to continue with the import or cancel out of the import (this dialog is always shown regardless of the ‘Confirmmobile stock count imports for locations’ configuration setting):
Solo Comms Mode - Zonal ID 202260
Previously, the only two till modes were Full Comms Mode with a dependency on the comms server and Standalone Mode, when connection to the comms server was lost.
The new Solo Comms Mode describes a POS terminal connected directly to the Site PC and operating without a connection to a comms server.
The ADVANTAGES of running in Solo Comms mode are:
-
no dependency on a comms server
-
POS terminal can operate without a network connection
-
POS terminal can be updated with a Send to POS from the Site PC (unlike Standalone mode)
-
Audit reader still polls POS terminals in this mode, to read transactional data back to the Site PC
-
unlike Standalone mode, you can connect peripherals directly to Solo Comms mode POS terminals
-
you can still create delayed orders
The DISADVANTAGES of running in Solo Comms mode are:
-
POS terminals in this mode operate independently of other POS terminals
-
round-follow-me is not possible
-
no account information (held on the comms server) is available. Recall and pickup of accounts only show accounts started on this POS terminal. Account numbers are only unique on this POS terminal, not across all other POS terminals operating in Full Comms mode
-
Stock countdown on a solo comms POS terminal does not update counts on other POS terminals
-
-
Tables (Tables product) tasks are not supported
-
the POS Integration Engine plugins are unsupported as they require a server to operate correctly
-
to use peripherals, they must be connected directly to the POS terminal in this mode
-
moneybelt sessions are not supported
-
you can only end a session with open accounts if security permissions allow
-
ZCPS ATS Advanced Roaming (pay at table) is not supported
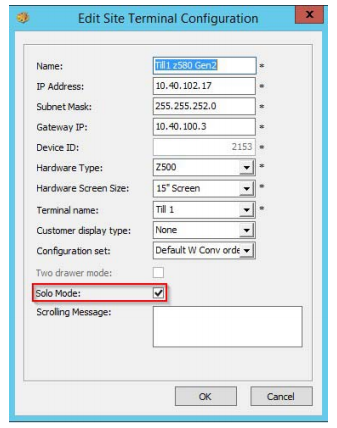
Head Office Configuration - Terminal Device Configuration
-
In Aztec Theme Modelling | Site Setup you can specify, on a per-terminal basis, that the terminal will operate in solo comms mode. This setting is applicable to all known physical Aztec terminal types but not applicable to MOA terminals
-
To enable solo comms mode - check the tick box
This setting is disabled by default and is not set on upgrade of a pre-existing Aztec dataset
-
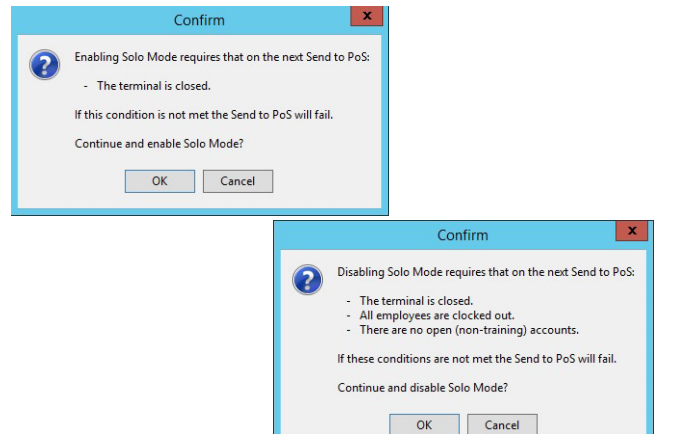
Confirm Yes on the presented dialogue to continue setting the terminal into solo comms mode
The Head Office user will not be allowed to set this configuration on terminals at lower version sites due to the conditions required for a POS to successfully enter solo comms mode
Head Office Configuration - Send Changes to Sites
For the new settings made at Head Office to take effect at site, perform a communications job to the required sites.
For detailed information on running communications jobs click here.
POS Terminal Operation
Please refer to the full list of operational advantages and disadvantages described at the start of this enhancement.
When ending a session that requires checking which other terminals in the same sales area are still open, solo comms mode terminals will be excluded from consideration. A solo comms mode terminal does not check other terminals before closing, only itself.
In order to go into solo comms mode, the terminal must be closed.
In order to leave solo comms mode:
-
the POS terminal must be closed
-
all employees must be clocked out
-
there must be no open non-training accounts
Kitchen iQ Updated Reports - Zonal ID 173803
Two new Kitchen iQ reports are now available within Aztec: Site Summary report and Late Ticket report.
Please refer to the separate Kitchen iQ: Reporting guide for a detailed description of the new and existing Kitchen iQ reports available at Head Office.
The previously available Preparation Summary report has now been removed.
New Purchase Reports - Zonal ID 187712
Purchases by Supplier Report
When opened, the report will show a single line per supplier for the time period chosen. The fields are:
-
Supplier Name
-
No of Delivery Notes - count of the number of delivery notes from this supplier in this time period
-
Quantity - total count of the number of items included in this supplier’s deliveries
-
Net Value - Total net value
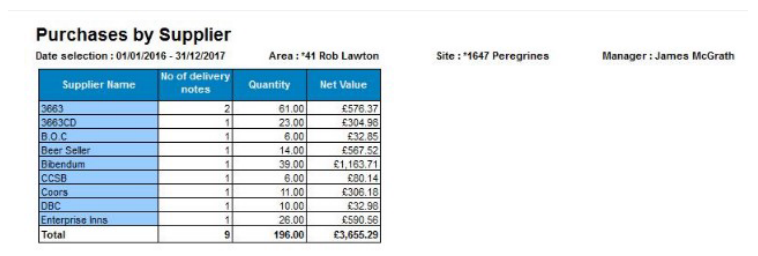
If the supplier is drilled through it will show just the single line for the selected supplier:
To drill through: right click on the supplier name
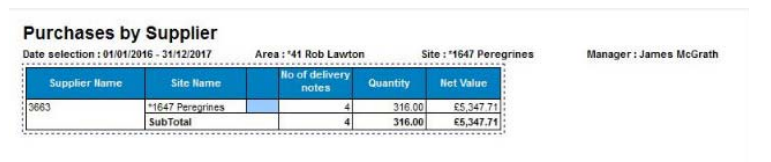
This opens a new report ‘Purchases Summary’. This report is designed to look like a continuation of ‘Purchases By Supplier’. It is hidden from the reports tree in dimensions and can only be accessed via this drill through option in the Purchases By Supplier report
-
Delivery Note - as entered into Aztec
-
Delivery Date - the delivery date as recorded in Aztec
-
Division - shows the Aztec division for the products
-
Source - if this delivery note originated as a manually entered note, or if it was created from an order. A ‘manual’ entered note is where the items are entered directly onto a delivery note with no reference to an order, an 'Order' note is when an order has been created and the delivery note is based on the order
-
Quantity - the total quantity of items on this delivery note
-
B2B - indicates if this note (not the supplier) is imported or not. This column is dependent on the APOS Purchase Status table and it will be hidden if there is no data
-
Total Net Value
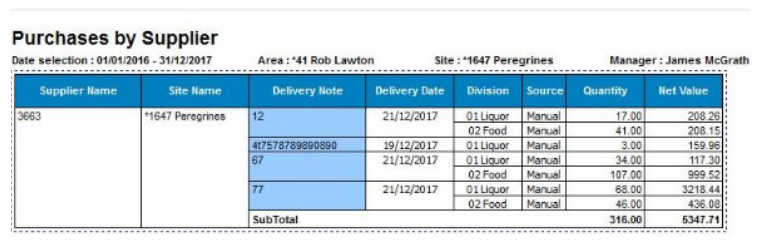
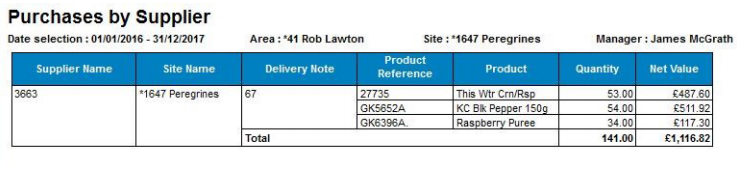
From this you can then drill through to the detail entered on the selected delivery note:
-
Product Reference - the Aztec purchase ref
-
Product - the name from Aztec Product Modelling
-
Quantity - the quantity delivered on this note
-
Total Net Value
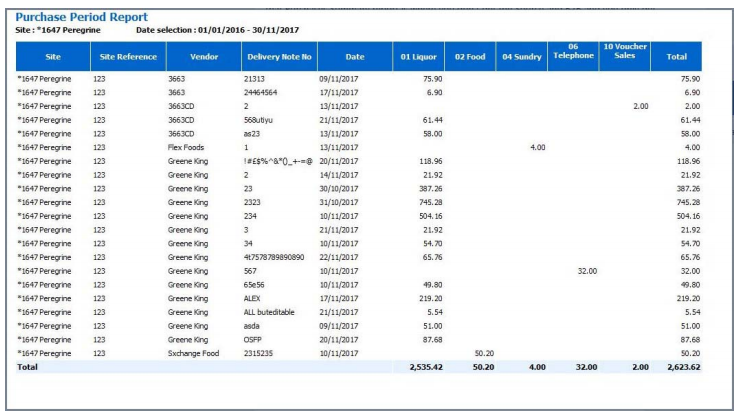
Purchase Period Report
This report shows the summary info on each delivery note in the time period shown. There are no drill through options from this report.
-
Site - name from Aztec
-
Site Reference - from Aztec
-
Vendor - name from Aztec
-
Delivery Note No. - as entered in Aztec
-
Date - Date of delivery (not date of entry)
-
Dry, Wet, etc. - Aztec division total of products purchases on this note
-
Total Net cost
Switch Off Auto Banking Report - Zonal ID 193984
Previously, the Aztec Finance workflow printed two copies of the Banking report automatically on completion of end of day. A customer could request that
Zonal adjusted the copy count of this report to one or more.
This enhancement enables a customer to request that the copy count is set anywhere from 0 to however many they require. Effectively, the automatic printing of the Banking report can now be switched off if desired.
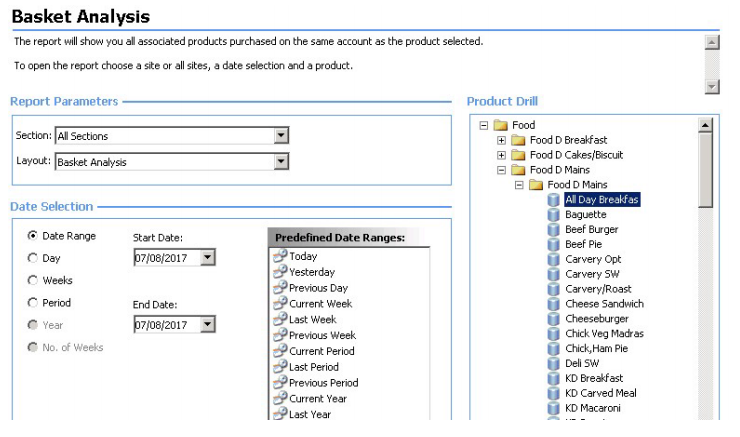
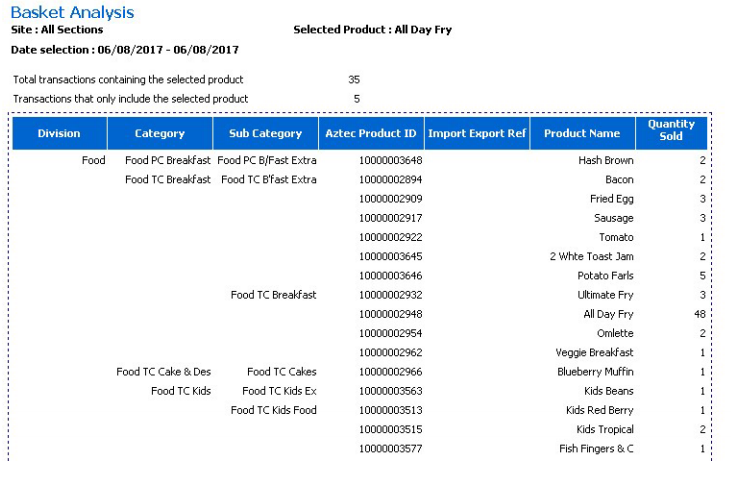
New Basket Analysis Report - Zonal ID 187713
To run this report you need to select a single product along with the section and date:
Once opened the report shows all items that have been sold along with the selected item. So in the example below the selected item is ‘All day Fry’. In the report header it shows the number of transactions that include the selected item and then the number of transactions that only had the selected item.
The main body of the report shows:
-
Division - the Aztec division for the sold item that is sold with the selected item
-
Category - the Aztec category as above
-
Sub Category - the Aztec sub-category as above
-
Import Export Ref - the product import / export reference from Aztec Product Modelling
-
Product Name - the Aztec name for the product sold
-
Quantity Sold - the total quantity sold where the selected item is included in an account
The example below shows, when an ‘all day fry’ has been sold, customers have also purchased 2 hash Browns, 2 bacon, 3 fried egg etc.
New Hotel Divisional Terminal POS Reports - Zonal ID 219624
-
Auto Sales Area Hotel Revenue report: provides figures for the sales area to which the terminal on which the report has been requested belongs
-
Terminal Hotel Revenue report: provides figures only for the terminal on which the report has been requested
These reports are based on the Auto Sales Area Revenue report and Terminal Revenue report, and show all the sales (by hotel division) and the payments (by
payment method) for an individual POS terminal and for a sales area. The main additions being Hotel divisional sales breakdown, service charge breakdown and tips.
Head Office Configuration - Add buttons to Theme
The Auto Sales Area Hotel Revenue & Terminal Hotel Revenue report button needs to be added to the relevant theme, this can be found in the button picker under Reports
For detailed information on adding buttons to theme panels root or local panels here or for shared / variation panels here.
Head Office Configuration - Send Changes to Sites
For the new settings made at Head Office to take effect at site, perform a communications job to the required sites.
For detailed information on running communications jobs click here.
POS Terminal Operation
The total payments received for the session(s) encompassed by the report range will be broken down by defined hotel division. Payment method total and sales total must balance and partial payments are apportioned across the applicable hotel divisions.
A hotel division will only appear on the report if there has been payments (including partial) taken against sales in sub-categories mapped to that hotel division. A hotel division will not appear if the division is mapped to any service charge (if a hotel division is mapped to one or more sub-categories and also a service charge, then the division will not be shown). For the given session(s) the total of all service charges, irrespective of any potential hotel division mapping, will be shown.
For the given session(s), the total of all tips taken against payments will be shown. The total of all divisional payments, service charges and tips will be shown.
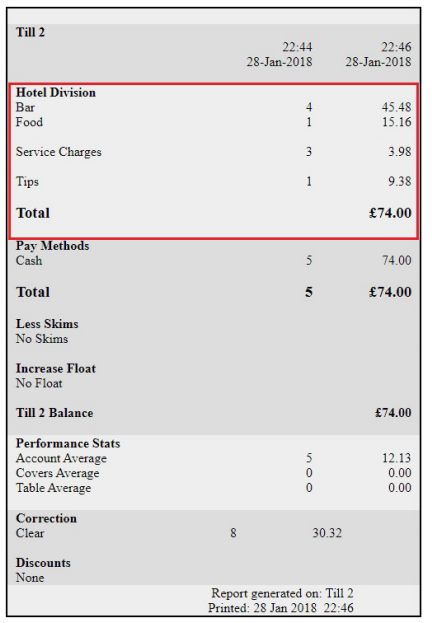
Both reports contain the following information for the current terminal session (at sales area or terminal level, depending on the report being run):
-
Session start date / time
-
Date / time report contains information for
-
Hotel Divisional Sales - list of divisions and total value of sales by division
-
Note: Service charges that are aligned to a Hotel division are excluded from the divisional revenue totals.
-
-
Service Charges - displays a list of service charges that have been applied to any account that has received a payment in the current session; displays the total value accrued against each of service charges. When an account has been part-paid, the service charge value is apportioned to reflect the amount paid
-
Tips - total tips received
-
Total value of sales, service charges and tips
-
Payment Method Details - list of payments received, count of transactions by payment method and the total value of payments by payment method
-
Total value of payments received
-
List of uplifts and value of each uplift
-
List of floats and value of each float
-
Total balance across Sales area / terminal (payment received less uplifts, plus floats)
-
Performance stats section
-
Account Average - count of accounts and average value of sales per account
-
Covers Average – count of covers and average value of sales per covers
-
Table Average – count of tables and average value of sales per table
-
Corrections – list of corrections types applied, count and value per correction type
-
Discounts – list of discounts applied, count of how many times each discount type has been applied and the total value by discount type
-
-
Report Footer - displays the terminal it was generated from and the date / time it was printed